
Hello World DMA
- How to get a “Hello World” (DMA) on PicoEVB
- Preliminaries
- Generating the Bitstream
- Flashing the ?ROM?
- Testing DMA (i.e., the actual “Hello World”)
- Final Product
- Useful Links
How to get a “Hello World” (DMA) on PicoEVB
Preliminaries
- Download Vivado and etc. Note only tested with 2021.1.1 (make sure you download drivers for Artix 7 boards)
- Download/build https://github.com/RHSResearchLLC/xvcd/
- Download/install/build (https://github.com/Xilinx/dma_ip_drivers/) using
cd XDMA/linux-kernel/xdma && make install-
If you get an error regarding
 At main.c:160:
 - SSL error:02001002:system library:fopen:No such file or directory: ../crypto/bio/bss_file.c:69
 - SSL error:2006D080:BIO routines:BIO_new_file:no such file: ../crypto/bio/bss_file.c:76
 sign-file: certs/signing_key.pem: No such file or directory
   DEPMOD  /lib/modules/5.13.0-27-generic
 Warning: modules_install: missing 'System.map' file. Skipping depmod.
then you need to generate certs in
/lib/modules/$(uname -r)/build/certs(taken from https://superuser.com/a/1322832)-
create
x509.genkey[ req ] default_bits = 4096 distinguished_name = req_distinguished_name prompt = no string_mask = utf8only x509_extensions = myexts [ req_distinguished_name ] CN = Modules [ myexts ] basicConstraints = critical,CA:FALSE keyUsage = digitalSignature subjectKeyIdentifier = hash authorityKeyIdentifier = keyid - run
openssl req -new -nodes -utf8 -sha512 -days 36500 -batch -x509 -config x509.genkey -outform DER -out signing_key.x509 -keyout signing_key.pem - Copy
signing_key.x509andsigning_key.pemto/lib/modules/$(uname -r)/build/certs(if you didn’t already just generate there)
-
-
Generating the Bitstream
- Open the PicoEVB project in Vivado, through
PicoEVB/Sample-Projects/Project-0/FPGA/picoevb.xpr - Hit
Generate Bitstream(underProgram and Debugbottom left).-
If you get errors that look like
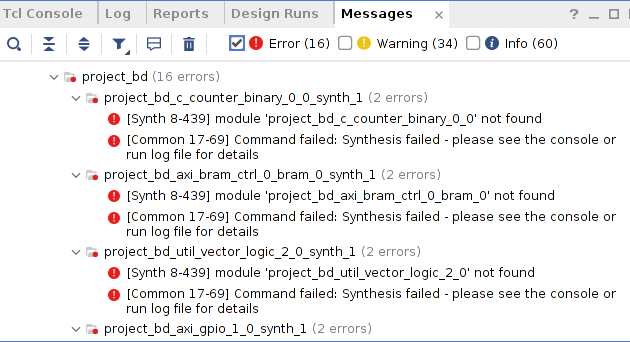
which are super confusing because those modules do exist (i.e., as directories in the source tree) you might have to “Upgrade IP” for some module. Find the top level whatever in the sources tab and click
Report IP Status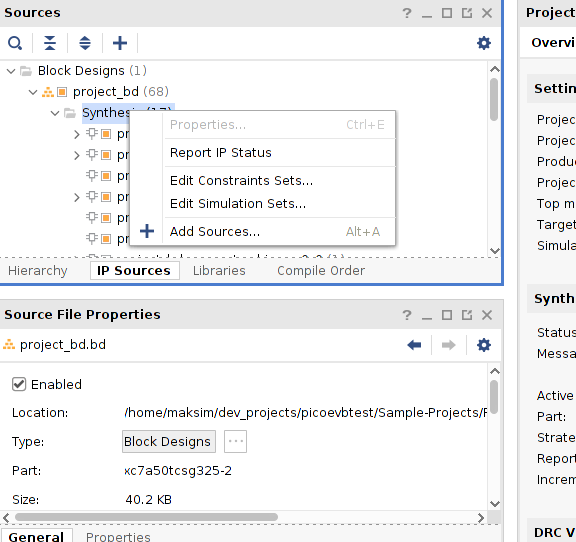
which should pull a thing like this at the bottom of the screen
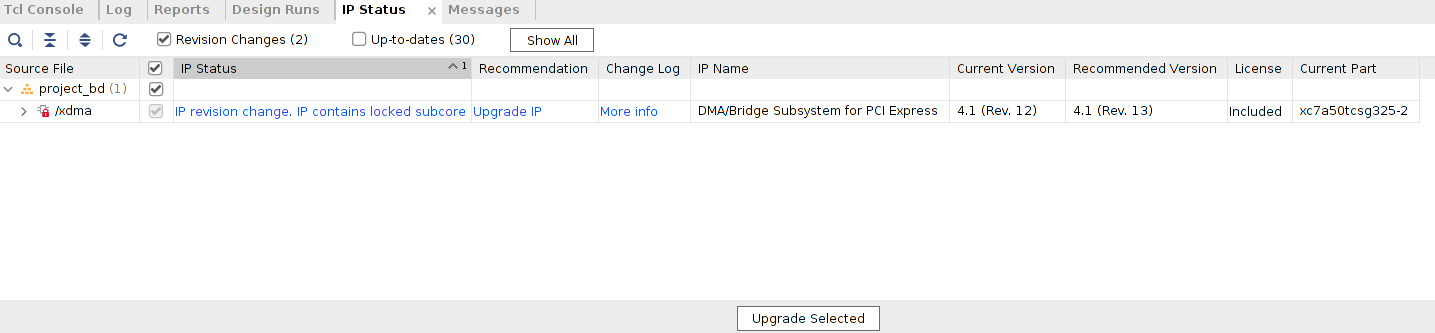
click
Upgrade Selectedyou should get a pop-up like this; if not you right click the same top-level spot and selectGenerate Output Products
-
Once all of that is done you can click
Generate Bitstreamand it should work 🤞
-
-
Once the bitstream is generated you’ll get a pop-up that lets you
Generate Memory Configuration File. Following the listed command at README.mdwrite_cfgmem -force -format mcs -size 4 -interface SPIx4 \ -loadbit {up 0x00000000 "./picoevb.runs/impl_1/project_bd_wrapper.bit" } \ -file "../mcs/proj0.mcs"you should select

Flashing the ?ROM?
- Run
xvcd(that you setup here) usingsudo ./xvcd -P 0x6015(no clue why the port needs to be in hex) -
Back in Vivado, connect the JTAG “virtual” cable by opening hardware manager

clicking the connect icon

then right clicking localhost and clicking
Add Xilinx Virtual Cable(this is will make use ofxvcdfrom above). It might take a while…
- Once you’ve done all that you should be able to click
Program Device(same bottom left)
Testing DMA (i.e., the actual “Hello World”)
- Load the kernel module (using tests/load_driver.sh, that you setup here)
-
If you get
 Loading xdma driver...
 Error: The Kernel module installed correctly, but no devices were recognized.
  FAILED
then check
dmesgfor something like[13941.276029] xdma:map_bars: Failed to detect XDMA config BAR [13941.306054] xdma:probe_one: pdev 0x00000000ad7d31b7, err -22. [13941.306063] xdma:xpdev_free: xpdev 0x00000000648e3236, destroy_interfaces, xdev 0x0000000000000000. [13941.306065] xdma:xpdev_free: xpdev 0x00000000648e3236, xdev 0x0000000000000000 xdma_device_close.which means you need to rescan the pci bus using
 $ echo 1 > /sys/bus/pci/devices/0000\:03\:00.0/remove
 $ echo 1 > /sys/bus/pci/rescan
(from https://github.com/RHSResearchLLC/PicoEVB/issues/12)
-
-
Run
[Sample-Projects/Project-0/Host/dma-test.py](https://github.com/RHSResearchLLC/PicoEVB/blob/0319d34e25f21c830fdf7e81867bafb07c7913af/Sample-Projects/Project-0/Host/dma-test.py)and you should get something likeroot@maksim-Inspiron-5577:/home/maksim/dev_projects/PicoEVB/Sample-Projects/Project-0/Host# python3 dma-test.py Sent in 0.10848045349121094 milliseconds (37.75795425054945 MBPS) Received in 0.09036064147949219 milliseconds (45.32947014248021 MBPS) OKNote that you need to run this as root because it writes/reads directly to from
/dev/xdma0_*.-
If you get an error like
 Traceback (most recent call last):
   File "/home/maksim/dev_projects/PicoEVB/Sample-Projects/Project-0/Host/dma-test.py", line 50, in <module>
     main()
   File "/home/maksim/dev_projects/PicoEVB/Sample-Projects/Project-0/Host/dma-test.py", line 13, in main
     fd_h2c = os.open("/dev/xdma/card0/h2c0", os.O_WRONLY)
 FileNotFoundError: [Errno 2] No such file or directory: '/dev/xdma/card0/h2c0'
then double check the path
/dev/xdma/card0/h2c0; on my laptop the correct paths were/dev/xdma0_h2c_0.
-
Final Product
Useful Links
- https://github.com/RHSResearchLLC/PicoEVB
- https://github.com/Xilinx/dma_ip_drivers/
- https://github.com/NVIDIA/jetson-rdma-picoevb (this one was useful for getting oriented with flow via the scripts under fpga-picoevb)